本笔记中会多次提到Fast RCNN的架构,对Fast RCNN的概念与架构有疑问的可以参考

Fast RCNN

或者我的Fast RCNN笔记

Notes on Fast RCNN

从RCNN到Fast RCNN,所有的detection任务都使用了selective search来提取region proposal,因此诞生了用神经网络来提取region proposal的方法,进一步提升检测速度的同时还提升了检测的准确率.

Motivation

  • Fast RCNN ignores the time spent on region proposals
  • Region proposal methods used in research are implemented on the CPU
  • The feature maps can also be used for generating region proposals 简单说就是提取proposal的步骤太花时间,而且作者希望尽可能用GPU完成所有的计算。

Region Proposal Networks (RPN)

Basic Notions

  • Fully-convolutional network for generating region proposals
  • Share computation of convolutions with start-of-art object detection networks

Architecture

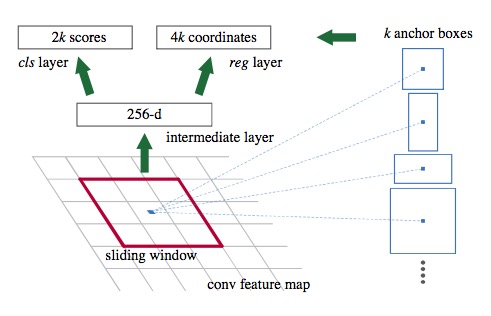
  • RPN与卷积层共享权重,也就是说RPN的输入就是最后一个卷积层的输出的feature map,得到输入后使用滑动窗口的方式得到更低维的向量
  • 将得到的向量输入到两个并联的全连接层
    1. box-regression layer (bounding box regressor)
    2. box-classification layer (objectness)

类似于Fast RCNN的RoI pooling层后面的架构,RPN输出的feature用来训练两个分类器,一个用来判断这个RoI是否包含object,另一个用来做bounding box回归(即给定一个anchor判断bounding box的位置)

  • 每个滑动窗口中心记作一个anchor,对应9种variant,相当于对于每一个feature map用9种sliding window计算vector,后面的输出也变成9倍,这么做是为了对图像的transformation有更好的鲁棒性 RPN

  • Loss Function的定义与Fast RCNN类似

\[ L(p_{i},t_{i}) = L_{cls}(p_{i},{p_{i}}^{*}) + \lambda{p_{i}}^{*}L_{reg}(t_{i},{t_{i}}^{*}) \]

由两部分构成:regression的Loss和classification的Loss,通过\(\lambda\)控制两类Loss的比重 公式中\(p_{i}\)表示一个region中包含object的概率,\({p_{i}}^{*}\)表示ground truth, 是一个0-1指示器,当某个anchor被标注为含有一个object时它的值才是1,否则为0, \(L_{cls}(p_{i},{p_{i}}^{*})\)的定义方式与Fast RCNN中相同

Training RPN

  • mini batch构成
    1. 随机选取一张图片的256个anchor,正负样本为1:1
    2. 用高斯分布初始化权重
  • Trainging的四个步骤 这里引用一下原文:
    1. First, train the RPN is initialized with an ImageNet-pre-trained model and fine-tuned end-to-end for the region proposal task.
    2. In the second step, we train a separate detection network by Fast R-CNN using the proposals generated by the step-1 RPN. This detection network is also initialized by the ImageNet-pre-trained model.
    3. In the third step, we use the detector network to initialize RPN training, but we fix the shared conv layers and only fine-tune the layers unique to RPN.
    4. Now the two networks share conv layers. Finally, keeping the shared conv layers fixed, we fine-tune the fc layers of the Fast R-CNN.

总体而言训练方式在训练Fast RCNN的基础上做了改进,Fast RCNN输入的region proposal由RPN提供,之后用Fast RCNN的权重重新初始化RPN的参数,做到权重共享,保持这些权重不变,只对RPN中的几层进行微调,最后再对全连接层进行微调。

这样做的好处显而易见,实时检测时,前面卷积层提取feature map直接送给RPN, Fast RCNN等待RPN计算proposal,用GPU计算proposal速度很快,与Fast RCNN不同的是不需要selective search,提取proposal的步骤与detection合并,在原先的卷积层与RoI pooling层之间加入了一个RPN提取proposal,之后Fast RCNN的全连接层利用RPN的输出向量进行detection

笔者认为从RCNN到这里的Faster RCNN,有一点bounding box regression和object classification的joint learning的味道了。

最后RPN结合Fast RCNN可以做到单纯用神经网络进行object detection,不依靠selective search这样的low-level feature的方法,完全依靠deep learning进行图像的理解。

不过有时间还是要把selective search也看一下,毕竟这篇论文有很高的引用量。

RCNN本身概念比较简单,但是论文中提到了许多object detection的经典方法非常有用,这些内容绝大部分在附录中,在阅读其他论文时相信会有很大帮助。

Basic Notions

  • Pipeline method
    1. 提取独立于物体类别的region proposal
    2. 使用CNN做特征提取
    3. 调整CNN参数用于从候选的proposal中获取包含object的proposal(domain-specific fine-tuning)
    4. SVM进行分类

RCNN for Object Detection

Testing

  • Selective search 提取region proposal(非本文重点)
  • 使用已经训练好的CNN(dataset: ILSVRC2012 classification caffe implementation) 提取proposal的特征,为了将输入标准化,强制将每个proposal resize到227*227
  • CNN提取的特征输入到SVM中进行分类

Training

按照笔者个人理解,为了让CNN有detection的能力,我们需要让网络具备分辨哪些proposal可能包含object,因为selective search选取的许多proposal其实没有object或者仅包含了object的一小部分。

因此文中加了一步对CNN参数的调整(domain-specific fine-tuning),主要目的就是筛选proposal

在实验部分作者也进行了对比,结果证明使用了fine-tuning比不使用要高8%的mAP

  • Supervised pre-training
    1. CNN on ILSVRC2012 with 2.2% error rate
    2. training set: images with image-level annotations, no bounding boxes
  • Domain specific fine-tuning
    1. N+1 classification: N object classes and 1 background
    2. Use warped region proposals for tuning
    3. Positive training examples: region proposals with >0.5IoU overlap(the rest as negative)
  • Object category classification
    1. Positive examples: ground-truth boxes, Negative: region proposals with <0.3IoU overlap
    2. Trade-off between SVM and Softmax
    3. Different definition for training sets between fine-tuning and classification

这里作者提了两个问题 (在附录里均有解答):

1. 为什么在第二步fine-tune CNN参数使用的训练集和训练SVM分类器的训练集不同(尤其是threshold的选择不一样)?
2. 为什么不使用softmax分类器而选择SVM?  

Appendix

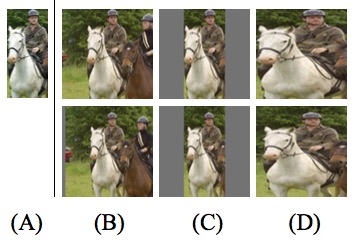
  • Object proposal transformations 由于CNN输入是227*227的正方形图像,因此需要对proposal进行缩放处理,文中提出了3种不同的处理方式:
    1. tightest square with context(等比例缩放proposal在原始图像中的bounding square)
    2. tightest square without context(等比例缩放proposal在原始图像中的bounding square,但要去掉在bounding square中而不在原始proposal中的部分)
    3. 强制缩放proposal 3种变形的方式如下图中所示:transformation
  1. origin proposal (B) tightest square with context (C) tightest square without context (D) warp
  • Positive vs negative examples and softmax
    1. 用于fine-tuning的数据集过少,因此将降低了positive example的要求,只要IoU大于0.5就认为可能有object在这个proposal里面,作者同时指出这样能够防止overfitting
    2. 使用softmax比SVM降低3.3%的mAP,主要原因可能在于fine-tuning的训练集不那么强调box的位置,且SVM使用的nagative sample更具有区分度
  • Bounding-box 回归
    1. 使用最后一个pooling层的输出训练线性回归模型来预测detection window
    2. 实验结果表明使用BB regression效果更优

Insights

  • Most feature information is extracted by the convolutional layers
  • The structure of CNN really matters(nearly 7~8% mAP)

下面两点是这篇文章的核心:

  • High-capacity CNN to bottom-up region proposals in order to localize and segment objects(CNN用于detection)
  • Effective method: supervised pretraining (auxiliary data eg. classification)/fine-tuning(scarce data eg. detection)(fine-tuning的重要性不言而喻)

Fast RCNN在RCNN的基础上修改了网络结构,同时加快了训练速度并且降低了训练成本,从工程角度说RCNN提出了思路而Fast RCNN的实用性更强

Motivation (Drawbacks of RCNN)

  • RCNN的训练方式按照一个一个阶段分的比较开
  • 训练时RCNN会将每个proposal的特征向量存储在硬盘上,不仅占用存储空间,时间上也因为读写磁盘而变得很慢
  • 在进行detection测试时耗时长

Fast RCNN Training

文章的亮点在于对原来网络结构的改进

  • RoI Pooling Layer 按照作者所述,该层的思想类似于SPPnet,我们假设最后一个卷积层得到N个feature map(这些feature map包含原始图像的所有信息),而我们只想提取感兴趣的部分,因此这就需要引入RoI了

将这N个feature map和selective search得到的R个region proposal输入到RoI pooling层中,根据RoI中指定的区域对原始的feature map进行pooling得到这R个region proposal的N个feature map

由于各个RoI的大小不一样,而为了使得每个RoI pooling出来的feature长度相同,采用不同大小的pooling窗口而已

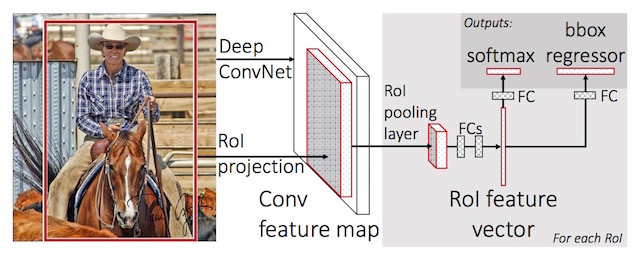
  • 对原始CNN网络结构的修改 修改主要有3处

    1. 将最后一个max pooling层替换为RoI pooling层
    2. 将最后一个全连接层和softmax层替换为两个同并列的层
    1. K+1个class的分类器
    2. Bounding box回归(Localization)
    1. 修改网络的输入,使其接收N个image和R个RoI 最后网络结构如图所示:fast-rcnn

核心在于使用RoI pooling层直接提取原始feature map中属于RoI的那一部分

  • Fine-tuning微调

    网络结构变化带来的是训练方式的变化,作者在现有的CNN分类网络上进行了微调,类似于RCNN中的domain-specific fine-tuning,只不过这次是针对网络结构而调整训练方式

    1. Multi-task Loss

    简单来说就是将分类的Loss和bounding box回归的Loss做了加权和

    \[ L(p,k^*,t,t^*) = L_{cls}(p,k^*) + \lambda[k^*\ >\ 1]L_{loc}(t,t^*) \]

    \[ smooth_{L_1}(x) = \begin{cases}0.5x^2 \ &if \ |x| < 1 \cr |x|-0.5 \ &otherwise \end{cases} \]

    第一部分是softmax分类器的Loss,第二部分是regression的Loss,值得注意的是第二部分有个指示函数,说明不会计算那些background类型的proposal的locaolization误差

    1. mini-batch sampling

    每一次SGD的batch使用2个image和128个RoI,每个batch中RoI的构成: 1.25% ground truth中的bounding box IoU>0.5, 2.75% IoU < 0.5, 看作background example

    1. BP through RoI pooling layer

    在进行反向传播时RoI pooling layer有些许不同, 参与pooling的不再是整幅图像而是可能有重叠的RoI区域,计算公式如下:

    \[ {\partial L \over \partial x} = \sum_{r\in R} \sum_{y\in r} [y\ pooled\ x] {\partial L \over \partial y} \]

    y代表pooling后的值, 反向传播的思想是要将每个y的偏导传递给所有参与pooling的变量x,这也就是指示函数 [y pooled x] 的含义,在这里x代表的是原来RoI中的元素

  • Scale invariance 如何处理输入图像尺寸不一的问题? 作者给出了两种方案:
  • brute force 强制把图像resize到同一尺寸下
  • image pyramids 利用图像金字塔,把图片resize成不同的大小,选取其中最接近optimal scale(也就是227*227)的大小用作训练。

Fast RCNN Detection

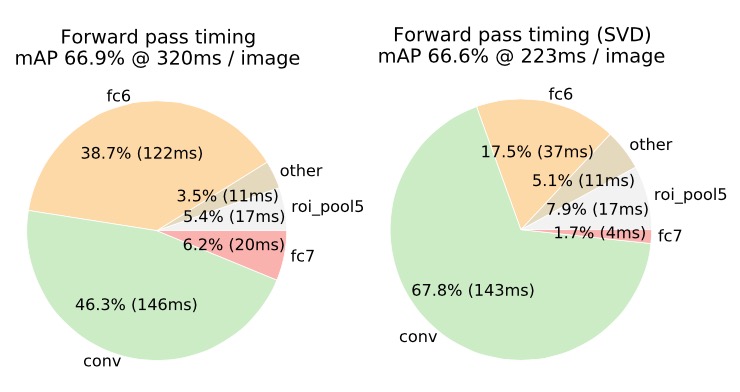
  • Truncated SVD 全连接层的计算时间太长,占用了整个前向传播的一半时间,因此在进行矩阵乘法时,作者采用SVD将权重矩阵\(W (u \times v)\)分解为三个矩阵的乘积:

\[ W \approx U \Sigma_tV^T \]

SVD分解后的U和V都是对称矩阵 最后一个全连接层被分解为两个子层:第一层的权重矩阵为$ _tV^T \(,第二层的权重矩阵为\)U\(,因此整个参数的个数由\)uv\(变成了\)t(u+v)$,当t比较小(意味着原参数矩阵的特征值少)的时候计算时间就会大大减少 training_time

Experiment Insights

  • 卷积层和全连接层一样需要fine-tuning,且浅层的卷积层没有微调的必要。 > decrease mAP from 66.9% to 61.4%

  • 首先用classification loss训练,之后加入bbox regression训练效果更好 > improvement ranges from +0.8 to +1.1 mAP points

  • trade-off: speed > performance improvement brought by multi-scale
  • More data brings higher mAP
  • Softmax slightly outperforms SVM
  • Sparse proposals(selective search) improve detection quality and dense proposals(sliding window) free the heavy running cost.

说明:安装时为了支持python版本,且为了安装方便,最好首先安装anaconda,anaconda安装起来方便并且集成了许多科学计算库,主要为了配合theano使用

如果想安装opencv、添加caffe matlab等等最好先看教程中相关部分最后再编译caffe比较保险

安装caffe

1.安装build-essentials

安装开发所需要的基本包(一般装完系统就有) sudo apt-get install build-essential

2.安装NVIDIA驱动

2.1 退出图形界面

1)由于有的带有gpu的电脑在启动时默认使用独显作为主要显示设备,因此我们需要将bios设置改为使用集显作为显示设备
2)进入ubuntu,按ctrl+alt+F1进入tty,登陆tty后输入:
    sudo service lightdm stop
其他desktop manager也需要关闭

2.2安装驱动

准备工作:

1)Verify the system has a CUDA-capable GPU.

控制台输入以下命令:

lspci | grep -i nvidia

如果列出了当前NIVDIA显卡的信息则说明电脑的GPU事CUDA-capable的

2)Verify the system is running a supported version of Linux.

控制台输入以下命令:

uname -m && cat /etc/*release

输出的结果中如果显示x86_64则说明电脑是x86架构的,在下载驱动安装包时选择对应的包即可

3)Verify the system has gcc installed.

控制台输入:

gcc --version

确认gcc版本正确

4)Download the NVIDIA CUDA Toolkit.

从NVIDIA官网上下载对应的驱动安装包 下载地址:

 https://developer.nvidia.com/cuda-downloads

控制台输入以下命令:

 sudo dpkg -i cuda-repo-<distro>_<version>_<architecture>.deb
        sudo apt-get update
        sudo apt-get install cuda

5)配置环境变量和lib库路径 安装完成后需要在/etc/profile中添加环境变量, 在文件最后添加:

PATH=/usr/local/cuda-7.0/bin:$PATH
export PATH
    

保存后使得环境变量立刻生效(或者重新打开控制台)

source /etc/profile
    

在 /etc/ld.so.conf.d/加入文件 cuda.conf, 内容如下

/usr/local/cuda-7.0/lib64

6)验证是否安装正确:

cd /usr/local/cuda-7.0/bin/
cuda-install-samples-7.0.sh <dir> 
    

dir为目标路径,脚本会把sample文件复制到指定路径下,之后进入该路径make就好了

编译完成后进入bin/x86_64/linux/release

执行./deviceQuery 如显示GPU信息说明cuda安装正确

3 安装atlas

使用gpu加速需要安装blas库,这里选择atlas

sudo apt-get install libatlas-base-dev

4 下载caffe安装包与安装环境

控制台输入:

git clone https://github.com/BVLC/caffe

也可以到github上下载zip文件解压

安装caffe的依赖库:

sudo apt-get install libprotobuf-dev libleveldb-dev libsnappy-dev libopencv-dev libhdf5-serial-dev
sudo apt-get install --no-install-recommends libboost-all-dev
sudo apt-get install libgflags-dev libgoogle-glog-dev liblmdb-dev protobuf-compiler

5 安装anaconda

不使用ubuntu自带的python是因为anaconda集成了许多科学计算库如numpy、scipy等,而且安装theano也很方便 在anaconda官网上下载安装包直接安装即可,默认安装路径为

~/anaconda

添加bin到PATH环境变量即可 打开控制台输入python确认使用的是anaconda里面的python 安装pip

conda install pip

6 安装Caffe所需要的Python环境

然后执行如下命令安装编译caffe python wrapper 所需要的额外包

cd python
for req in $(cat requirements.txt); do sudo pip install $req; done

在运行Caffe时,可能会报一些找不到libxxx.so的错误,而用 locate libxxx.so命令发现已经安装在anaconda中,这时首先想到的是在/etc/ld.so.conf.d/ 下面将 $your_anaconda_path/lib 加入 LD_LIBRARY_PATH中。 但是这样做可能导致登出后无法再进入桌面!!!原因(猜测)可能是anaconda的lib中有些内容于系统自带的lib产生冲突。

正确的做法是:为了不让系统在启动时就将anaconda/lib加入系统库目录,可以在用户自己的~/.bashrc 中添加library path,比如我就在最后添加了两行

# add library path
LD_LIBRARY_PATH=your_anaconda_path/lib:$LD_LIBRARY_PATH
export LD_LIBRARY_PATH

开启另一个终端后即生效,并且重启后能够顺利加载lightdm, 进入桌面环境。

但在实际安装时注意先要等make和make test完之后再加这个路径否则会报错

7 编译caffe

完成了所有环境的配置,可以愉快的编译Caffe了! 进入caffe根目录, 首先复制一份Makefile.config

cp Makefile.config.example Makefile.config

然后修改里面的内容,主要需要修改的参数包括

BLAS (默认使用的是atlas)

DEBUG 是否使用debug模式,打开此选项则可以在eclipse或者NSight中debug程序

如要安装python caffe和mat caffe的话需要在Makefile.config中指定python路径和matlab路径

完成设置后, 开始编译

make all
make test
make runtest

前两步成功说明caffe编译成功,make runtest是在运行caffe的各个测试脚本

8 编译pycaffe

控制台输入: make pycaffe

之后设置环境变量 在~/.bashrc中添加

PYTHONPATH=/path/tp/caffe/python:$PYTHONPATH
export PYTHONPATH

打开控制台输入python,之后import caffe,import成功就说明caffe安装成功了

9 安装cudnn(可选)

9.1编译caffe之后安装cudnn

使用cudnn来加速GPU计算,cudnn支持caffe,theano和Torch7 在官网免费获得cudnn压缩包 下载之后控制台输入:

tar -xzvf cudnn-6.5-linux-R1.tgz
cd cudnn-6.5-linux-R1
sudo cp lib* /usr/local/cuda/lib64/
sudo cp cudnn.h /usr/local/cuda/include/

之后建立软链接(首先删除原先文件夹下的软链接):

cd /usr/local/cuda/lib64/
sudo rm -rf libcudnn.so libcudnn.so.6.5

然后修改文件权限,并创建新的软连接:

sudo chmod u=rwx,g=rx,o=rx libcudnn.so.6.5.18(未必是18,我的机子上是48,相应改就可以了) 
sudo ln -s libcudnn.so.6.5.18 libcudnn.so.6.5
sudo ln -s libcudnn.so.6.5 libcudnn.so

9.2编译caffe之前安装cudnn

解压cudnn之后只需将对应的文件复制到对应目录中即可,同时在编译caffe时Makefile.config中

use_cudnn:=1

去掉注释

unpack the library  
gzip -d cudnn-6.5-linux-x64-v2.tar.gz  
tar xf cudnn-6.5-linux-x64-v2.tar  

copy the library files into CUDA's include and lib folders  
sudo cp cudnn-6.5-linux-x64-v2/cudnn.h /usr/local/  cuda-7.0/include  
sudo cp cudnn-6.5-linux-x64-v2/libcudnn* /usr/local/    cuda-7.0/lib64      

10 安装opencv(可选)

opencv库在运行其他开源项目时可能需要用到因此也建议安装,这里安装的是支持GPU的,因此安装是需要添加支持GPU的选项

opencv安装起来神烦,Github上有人已经写好了完整的安装脚本: https://github.com/jayrambhia/Install-OpenCV

下载该脚本,进入Ubuntu/2.4 目录, 给所有shell脚本加上可执行权限: chmod +x *.sh

安装2.4.9版本: sudo ./opencv2_4_9.sh

该脚本会去尝试下载2.4.9的压缩包,如果下载速度太慢建议还是自己先下载好,再把脚本中下载的语句注释掉,sh文件需要修改的是在cmake的那一行中添加一个编译参数 -D BUILD_TIFF=ON,否则在make caffe的时候会报类似

/usr/lib/libopencv_highgui.so.2.4: undefined reference to TIFFRGBAImageOK@LIBTIFF_4.0' 1> 

的错误

安装过程中可能会遇到两个问题:

  • 1编译过程中报错:

    opencv-2.4.9/modules/gpu/src/nvidia/core/NCVPixelOperations.hpp(51): error: a storage class is not allowed in an explicit specialization

    http://www.samontab.com/web/2014/06/installing-opencv-2-4-9-in-ubuntu-14-04-lts/

解决方法在此:http://code.opencv.org/issues/3814 下载 NCVPixelOperations.hpp 替换掉opencv2.4.9内的文件, 重新build

  • 2编译过程中报错:

    nvcc fatal: Unsupported gpu architecture: 'compute xx'

    需要在cmake时添加参数指定你的GPU架构,参考这两篇blog:

    http://blog.csdn.net/sysuwuhongpeng/article/details/45485719 http://blog.csdn.net/altenli/article/details/44199539

11 caffe matlab(可选)

1 安装matlab:

参考教程:

Caffe提供了MATLAB接口, 有需要用MATLAB的同学可以额外安装MATLAB。安装教程请自行搜索。

安装完成后添加图标 matlab图标在该网站可以下载

http://www.linuxidc.com/Linux/2011-01/31632.htm

图标放到/usr/local/MATLAB/下

控制台输入以下内容

sudo vi /usr/share/applications/Matlab.desktop

复制代码

[Desktop Entry]
Type=Application
Name=Matlab
GenericName=Matlab R2014a
Comment=Matlab:The Language of Technical Computing
Exec=sh /usr/local/MATLAB/R2014a/bin/matlab -desktop
Icon=/usr/local/MATLAB/Matlab.png
Terminal=false
Categories=Development;Matlab;

2 matlab wrapper

控制台输入:

make matcaffe

安装完后在运行matlab demo时遇到报错

“libhdf5.so.6 no such file or directory”

但是到anaconda的lib目录下发现是有对应文件的,可能是动态链接库的问题,解决方法是到anaconda/lib目录下执行ldconfig就可以了

安装theano

1 安装theano

控制台输入 pip install theano即可

2 配置theano使其支持gpu加速

参考文档: http://deeplearning.net/software/theano/tutorial/using_gpu.html http://deeplearning.net/software/theano/install.html#gpu-linux http://deeplearning.net/software/theano/library/config.html#config.init_gpu_device

在用户根目录下新建.theanorc配置文档,配置如下:

[global]
floatX = float32
device = gpu

[nvcc]
fastmath = True

[blas]
ldflags = -lf77blas -latlas -lgfortran #put your flags here

检验是否theano可以使用gpu加速,测试脚本如下:

from theano import function, config, shared, tensor, sandbox
import numpy
import time

vlen = 10 * 30 * 768  # 10 x #cores x # threads per core
iters = 1000

rng = numpy.random.RandomState(22)
x = shared(numpy.asarray(rng.rand(vlen), config.floatX))
f = function([], tensor.exp(x))
print f.maker.fgraph.toposort()
t0 = time.time()
for i in xrange(iters):
    r = f()
t1 = time.time()
print 'Looping %d times took' % iters, t1 - t0, 'seconds'
print 'Result is', r
if numpy.any([isinstance(x.op, tensor.Elemwise) and
              ('Gpu' not in type(x.op).__name__)
              for x in f.maker.fgraph.toposort()]):
    print 'Used the cpu'
else:
    print 'Used the gpu'
如果显示used the gpu说明theano在使用gpu加速